INTRODUCTION
You ever want something sweet… but not too heavy?
Something soft, a little chewy, and full of real flavor not just sugar?
Maybe cookies feel too much. Cake feels like too much work.
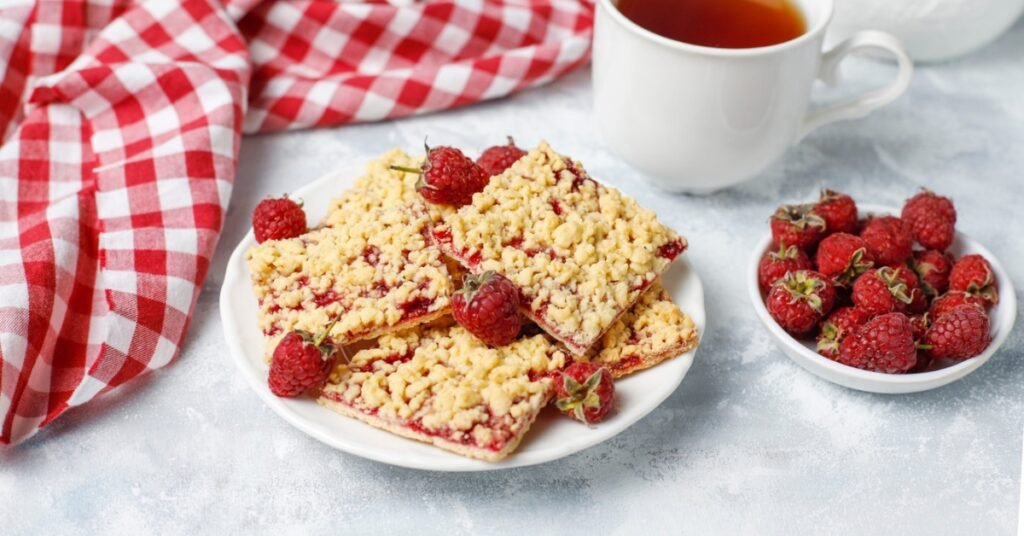
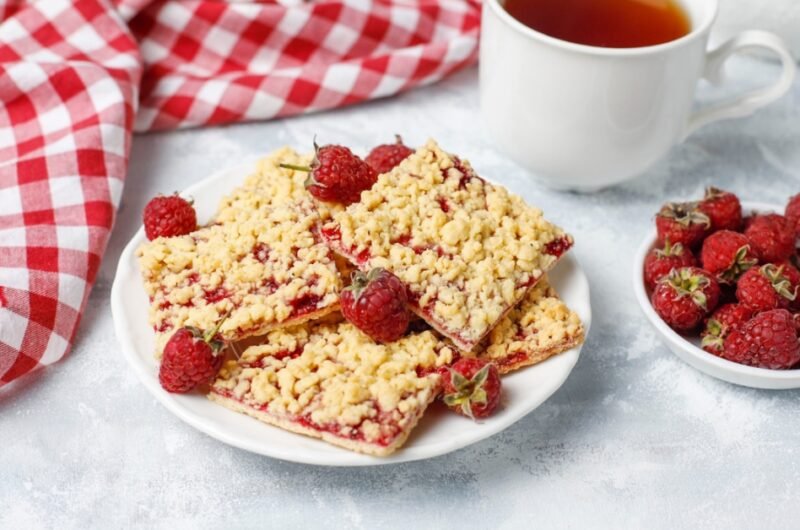
That’s where these strawberry oatmeal crumble bars come in.
They are soft, slightly crispy on top, and filled with sweet strawberry goodness.
And the best part? You can make them fast with simple ingredients you already have.
WHAT IS THIS RECIPE?
Strawberry oatmeal crumble bars are baked snack bars made with oats, flour, butter, and a sweet strawberry layer.
They have three parts: a soft base, a juicy fruit center, and a crumbly top.
The bottom is slightly firm. The middle is sweet and sticky. The top is golden and crispy.
It’s like a mix of a cookie and a fruit dessert all in one bite.
WHY YOU WILL LOVE THIS RECIPE
- Quick to prepare – No complicated steps or tools needed
- Perfect texture – Soft, chewy, and slightly crispy
- Budget-friendly – Uses basic pantry ingredients
- Healthier option – Oats make it more filling
- Great for meal prep – Make once, eat for days
- Kid-friendly – Sweet and easy to enjoy
- Customizable – Change fruits or flavors easily
Here’s where most people get this wrong…
They press the base too hard or use too much filling, which makes the bars soggy instead of perfect.
INGREDIENTS
- 1 1/2 cups rolled oats (use old-fashioned oats for best texture)
- 1 cup all-purpose flour
- 1/2 cup brown sugar (adds rich sweetness)
- 1/4 cup white sugar
- 1/2 teaspoon baking soda
- 1/4 teaspoon salt
- 1/2 cup melted butter (unsalted preferred)
- 1 teaspoon vanilla extract
For strawberry filling:
- 2 cups fresh strawberries (chopped small)
- 2 tablespoons sugar
- 1 tablespoon cornstarch (thickens the filling)
- 1 teaspoon lemon juice (adds brightness)
Tip: You can use strawberry jam if you’re short on time, but fresh gives the best flavor.
HOW TO MAKE (STEP-BY-STEP)
- Prepare the strawberry filling.
In a small pan, add chopped strawberries, sugar, lemon juice, and cornstarch. Cook on low heat while stirring gently. The mixture will slowly become thick, glossy, and jam-like. You should see the strawberries soften and release their juices. Keep cooking until it looks rich and slightly sticky. Let it cool completely before using. This helps it stay in place when baking. - Mix the dry ingredients.
In a large bowl, add oats, flour, brown sugar, white sugar, baking soda, and salt. Mix everything well until evenly combined. The mixture should look light and slightly crumbly. This step is important to make sure every bite has balanced flavor and texture. - Add butter and vanilla.
Pour melted butter and vanilla extract into the dry mixture. Mix using your hands or a spoon until it forms a crumbly dough. It should feel slightly moist but still crumbly, not wet. When you press it in your hand, it should hold its shape. This is the perfect texture. - Form the base layer.
Take about two-thirds of the mixture and press it into a lined baking tray. Press gently not too hard just enough to create an even layer. This small trick makes a huge difference… pressing too hard makes the base dense instead of soft. - Add the strawberry filling.
Spread the cooled strawberry mixture evenly over the base. Use a spoon to gently spread it to the edges. The layer should be even, not too thick. Too much filling can make the bars too soft. - Add the crumble topping.
Sprinkle the remaining oat mixture on top of the strawberry layer. Do not press it down. Let it stay loose and crumbly so it bakes into a crispy topping. This creates that perfect contrast of textures. - Bake to golden perfection.
Bake at 180°C for 30–35 minutes. The top should turn golden brown and slightly crispy. Let the bars cool completely before cutting. This helps them set and hold their shape. When ready, they should feel firm on the outside and soft inside.
PRO TIPS
- Use old-fashioned oats. They give better texture than quick oats.
- Let the filling cool before adding. Hot filling can soften the base.
- Do not overbake. It can make bars dry and hard.
- Line your tray with parchment paper for easy removal.
- Use fresh strawberries for best taste and color.
- Do not press the top layer. Keep it loose for crunch.
- Chill before cutting for clean slices.
- Adjust sugar based on strawberry sweetness.
- Store properly to keep texture perfect.
COMMON MISTAKES TO AVOID
- Pressing base too hard – makes it dense
- Using too much filling – causes sogginess
- Skipping cooling time – bars fall apart
- Overbaking – dries out texture
- Using watery strawberries – ruins consistency
- Not lining tray – bars stick and break
VARIATIONS / CUSTOMIZATION IDEAS
Now let’s make it even better…
- High protein – Add protein powder or nuts
- Vegan – Use plant-based butter
- Berry mix – Add blueberries or raspberries
- Chocolate twist – Add chocolate chips
- Quick version – Use store-bought jam
SERVING IDEAS
Enjoy these bars warm or cold.
Serve with tea, coffee, or milk.
You can even add a scoop of ice cream for dessert.
Perfect for lunchboxes, snacks, or quick treats.
STORAGE & REHEATING
Store in an airtight container at room temperature for 2 days.
Refrigerate for up to 5 days.
Reheat in microwave for 10 seconds if you like them warm.
NUTRITION FACTS (Approximate)
- Calories: 160 per bar
- Fat: 7g
- Carbs: 22g
- Protein: 2g
QUICK SUMMARY
- Easy to make
- Soft and chewy texture
- Sweet strawberry filling
- Budget-friendly
- Perfect snack or dessert
WHEN TO EAT THIS
Perfect for busy mornings when you need something quick.
Great for snack cravings during the day.
Ideal after workouts when you want something sweet.
Also perfect for late-night treats when you need comfort food fast.
Once you try them, they’ll become your go-to snack.
Homemade Strawberry Oatmeal Crumble Bars – Easy & Irresistible Treat
4
servings30
minutes40
minutes300
kcalIngredients
1 1/2 cups rolled oats (use old-fashioned oats for best texture)
1 cup all-purpose flour
1/2 cup brown sugar (adds rich sweetness)
1/4 cup white sugar
1/2 teaspoon baking soda
1/4 teaspoon salt
1/2 cup melted butter (unsalted preferred)
1 teaspoon vanilla extract
For strawberry filling:
2 cups fresh strawberries (chopped small)
2 tablespoons sugar
1 tablespoon cornstarch (thickens the filling)
1 teaspoon lemon juice (adds brightness)
HOW TO MAKE
- Prepare the strawberry filling.
In a small pan, add chopped strawberries, sugar, lemon juice, and cornstarch. Cook on low heat while stirring gently. The mixture will slowly become thick, glossy, and jam-like. You should see the strawberries soften and release their juices. Keep cooking until it looks rich and slightly sticky. Let it cool completely before using. This helps it stay in place when baking. - Mix the dry ingredients.
In a large bowl, add oats, flour, brown sugar, white sugar, baking soda, and salt. Mix everything well until evenly combined. The mixture should look light and slightly crumbly. This step is important to make sure every bite has balanced flavor and texture. - Add butter and vanilla.
Pour melted butter and vanilla extract into the dry mixture. Mix using your hands or a spoon until it forms a crumbly dough. It should feel slightly moist but still crumbly, not wet. When you press it in your hand, it should hold its shape. This is the perfect texture. - Form the base layer.
Take about two-thirds of the mixture and press it into a lined baking tray. Press gently not too hard just enough to create an even layer. This small trick makes a huge difference… pressing too hard makes the base dense instead of soft. - Add the strawberry filling.
Spread the cooled strawberry mixture evenly over the base. Use a spoon to gently spread it to the edges. The layer should be even, not too thick. Too much filling can make the bars too soft. - Add the crumble topping.
Sprinkle the remaining oat mixture on top of the strawberry layer. Do not press it down. Let it stay loose and crumbly so it bakes into a crispy topping. This creates that perfect contrast of textures. - Bake to golden perfection.
Bake at 180°C for 30–35 minutes. The top should turn golden brown and slightly crispy. Let the bars cool completely before cutting. This helps them set and hold their shape. When ready, they should feel firm on the outside and soft inside.